Ice Blue Diamond Grid Tote Free Crochet Pattern
Introduction
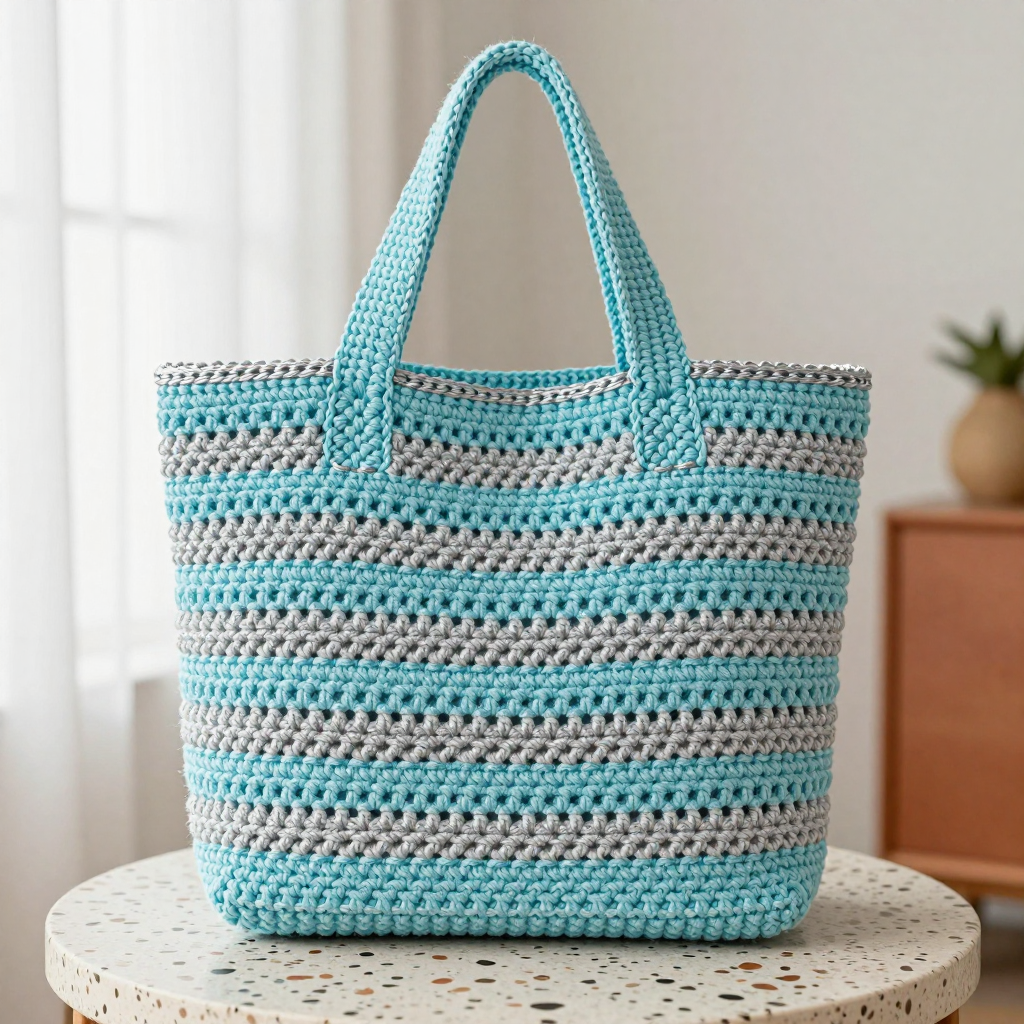
The Ice Blue Diamond Grid Tote is a beginner-friendly crochet project that turns simple single crochet into a striking desert boho accessory. Worked in joined rounds from a chain foundation, it builds a flat-bottomed, straight-sided bag with a delicate diamond grid of eyelet holes created by offset chain spaces. Alternating six-round bands of ice blue and silver give it a cool, breezy look that feels light in the hand and sturdy on the shoulder. If you can single crochet and chain, you can make this tote — and the finished 15-inch square bag is perfect for markets, beach days, or everyday errands.
Materials Needed
- Yarn: Worsted weight (4) acrylic or cotton blend — ice blue (A): 220 yards; silver (B): 220 yards
- Hook: 6 mm (J/10)
- Notions: Tapestry needle, scissors, stitch markers (optional), measuring tape
- Finished size: 15 inches wide by 15 inches tall, excluding handles
Abbreviations
- ch — chain
- sc — single crochet
- sk — skip
- sp(s) — space(s)
- st(s) — stitch(es)
- sl st — slip stitch
- rep — repeat
- A / B — Color A (ice blue) / Color B (silver)
Gauge
14 stitches and 8 rows = 4 inches in the diamond grid pattern. Crochet a small swatch in pattern and measure a 4-inch section; adjust your hook size if needed to match.
Tips Before You Start
- Keep your chain-1 spaces loose and even — tight eyelets distort the diamond grid and make the fabric pull.
- Count your 100 stitches at the end of every solid round; a missed stitch will throw off the offset hole placement.
- Change colors on the final yarn-over of the joining slip stitch so the new band begins cleanly.
- Work the foundation chain loosely, or use a larger hook for the chain only, so the bottom edge stays flat.
Step-by-Step Instructions
Body (worked in rounds)
With A, ch 51.
Rnd 1: Sc in 2nd ch from hook and each ch across, then sc in each ch on opposite side of foundation ch (100 sc). Join with sl st to first sc.
Rnd 2: Ch 1, sc in each sc around (100 sc). Join.
Rnd 3: Ch 1, sc in first 5 sc, *ch 1, sk next sc, sc in next 9 sc; rep from * to last 5 sc, ch 1, sk next sc, sc in last 4 sc. Join. (10 ch-1 sps)
Rnd 4: Ch 1, sc in each sc and in each ch-1 sp around (100 sc). Join.
Rnd 5: Ch 1, sc in first 10 sc, *ch 1, sk next sc, sc in next 9 sc; rep from * to last 10 sc, ch 1, sk next sc, sc in last 9 sc. Join. (10 ch-1 sps)
Rnd 6: Rep Rnd 4 (100 sc).
Rnds 7-8: Rep Rnds 3-4 (10 ch-1 sps on Rnd 7; 100 sc on Rnd 8).
Change to B.
Rnds 9-14: Rep Rnds 3-8.
Change to A.
Rnds 15-20: Rep Rnds 3-8.
Change to B.
Rnds 21-26: Rep Rnds 3-8.
Change to A.
Rnds 27-32: Rep Rnds 3-8.
Change to B.
Rnds 33-38: Rep Rnds 3-8.
Change to A.
Rnds 39-44: Rep Rnds 3-8.
Change to B.
Rnds 45-50: Rep Rnds 3-8.
Change to A.
Rnds 51-56: Rep Rnds 3-8.
Change to B.
Rnds 57-62: Rep Rnds 3-8.
Change to A.
Rnds 63-68: Rep Rnds 3-8.
Change to B.
Rnds 69-74: Rep Rnds 3-8.
Change to A.
Rnds 75-80: Rep Rnds 3-8. Fasten off.
Handles (make 2)
With A, ch 61.
Row 1: Sc in 2nd ch from hook and each ch across (60 sc). Turn.
Rows 2-3: Ch 1, sc in each sc across (60 sc). Turn.
Fasten off, leaving a long tail for sewing.
Assembly
Fold body flat to find the center. Mark handle placement 2 inches from each side edge on both front and back panels. Sew handles securely to the inside of the bag using the long tails.
Edging
With B, join yarn at top edge. Ch 1, sc evenly around the entire top edge, working through both layers at the handle placements. Join with sl st. Fasten off.
Assembly and Finishing
Weave in all ends on the wrong side of the bag, working each tail through several stitches before trimming. Sew each handle end firmly with a whip stitch or back stitch, going around the strap edges twice for strength. Block the tote lightly: mist with water, shape to 15 by 15 inches, and lay flat to dry with the handles relaxed and untwisted. Avoid hanging the bag while wet, as the weight of the water can stretch the single crochet fabric.
Pro Tips and Variations
- Add a fabric lining for structure and to keep small items from slipping through the eyelets.
- Swap the silver for a sandy tan or terracotta for a warmer desert palette.
- Make the handles longer (add chains in multiples of 1) for a shoulder-strap version, or work them in B for a contrasting accent.