Meadow Patchwork Granny Square Carryall: Free Crochet Pattern
Introduction
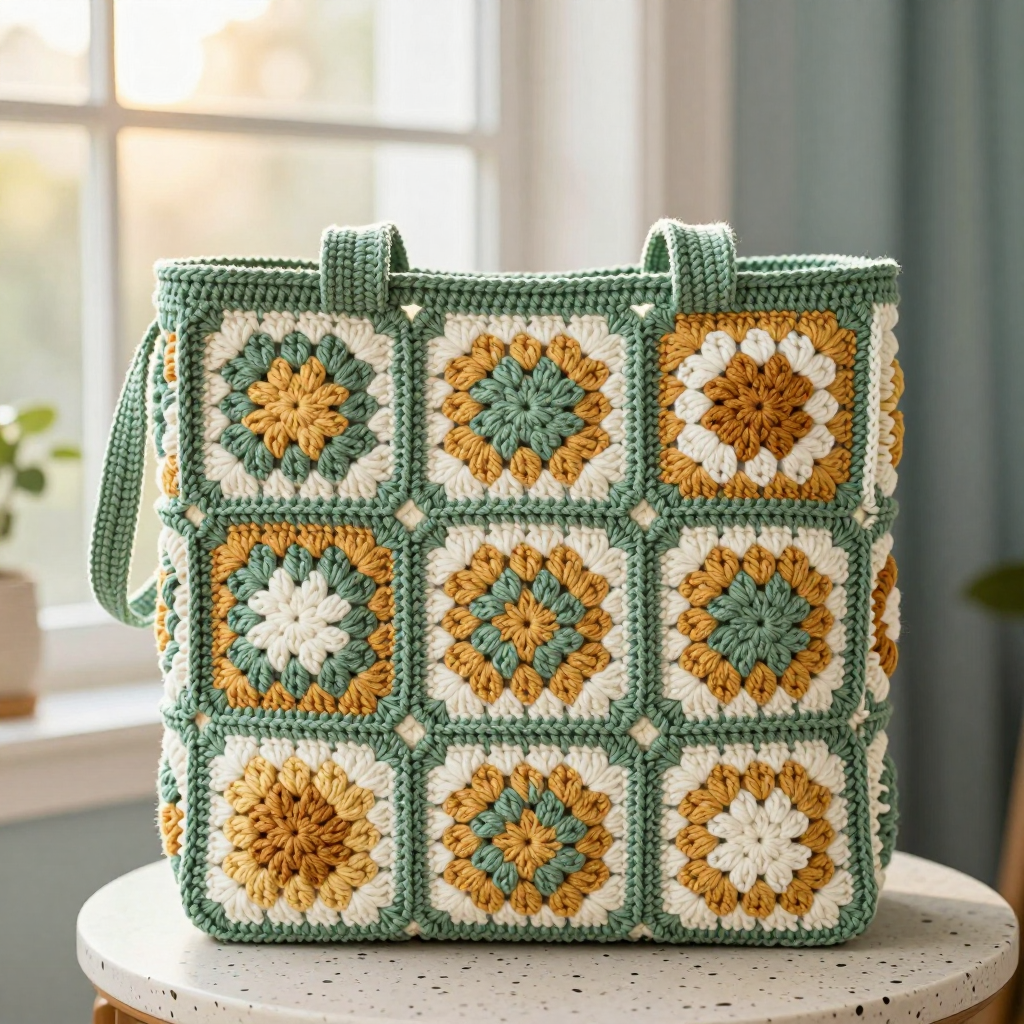
If you have ever wanted to make a bag that looks like a little patchwork quilt you can carry, the Meadow Patchwork Granny Square Carryall is for you. It is built from twelve classic granny squares in sage, ochre, and ivory, joined in a flat grid and folded into a roomy tote. Because every square is only four rounds, this is a wonderfully beginner-friendly project that lets you practice the granny square, joining, and simple single crochet handles without any shaping. The finished bag is soft and slightly slouchy, about 16" wide by 12" tall, with a calm bohemian look that goes with everything.
Materials Needed
- Yarn: Worsted weight (4) acrylic or cotton blend. Sage (A): 200 yd; Ochre (B): 150 yd; Ivory (C): 150 yd.
- Hook: 5.0 mm (H-8) crochet hook.
- Notions: Tapestry needle, scissors, stitch markers, rust-proof pins for blocking.
- Finished size: Approx 16" wide x 12" tall (excluding handles); handles 12" long.
Abbreviations
- ch – chain: yarn over and pull through the loop on your hook.
- sl st – slip stitch: insert hook, yarn over, pull through both the stitch and the loop on your hook.
- sc – single crochet: insert hook, yarn over, pull up a loop, yarn over, pull through both loops.
- dc – double crochet: yarn over, insert hook, pull up a loop, yarn over and pull through two loops twice.
- sp – space: the gap made by a chain.
- RS – right side: the front, public face of the work.
- rep – repeat.
Gauge
One granny square = 4" (10 cm) square after 4 rounds. Make one square and measure it flat; if it is larger than 4", go down a hook size, and if it is smaller, go up a hook size.
Tips Before You Start
- Work all twelve squares first and block them to exactly 4" so the grid lines up neatly when you join.
- Keep your ch-1 spaces snug; loose spaces make the squares grow and the bag lose its shape.
- Sort your squares into the 3x4 layout before joining so you never have to undo a seam.
- When joining, work in back loops only as written — this gives the flat, tidy seam that makes the patchwork look crisp.
Step-by-Step Instructions
Granny Square (make 12)
Make 4 squares with A as Color 1, 4 with B as Color 1, and 4 with C as Color 1. Use the other two colors for Colors 2 and 3, rotating them so each square has three different colors.
Set-up: With Color 1, ch 4, join with sl st to form a ring.
R1: Ch 3 (counts as dc), 2 dc in ring, [ch 2, 3 dc in ring] 3 times, ch 2, join with sl st to top of ch-3 (12 dc, 4 ch-2 sps).
R2: Ch 3, 2 dc in same sp, ch 2, 3 dc in same sp, *ch 1, [3 dc, ch 2, 3 dc] in next ch-2 sp; rep from * around, ch 1, join with sl st to top of ch-3. Fasten off Color 1 (24 dc, 4 ch-1 sps, 4 ch-2 sps).
R3: Join Color 2 with sl st in any ch-2 sp, ch 3, 2 dc in same sp, ch 2, 3 dc in same sp, *ch 1, 3 dc in next ch-1 sp, ch 1, [3 dc, ch 2, 3 dc] in next ch-2 sp; rep from * around, ch 1, join with sl st to top of ch-3. Fasten off Color 2 (36 dc, 8 ch-1 sps, 4 ch-2 sps).
R4: Join Color 3 with sl st in any ch-2 sp, ch 3, 2 dc in same sp, ch 2, 3 dc in same sp, *[ch 1, 3 dc in next ch-1 sp] twice, ch 1, [3 dc, ch 2, 3 dc] in next ch-2 sp; rep from * around, ch 1, join with sl st to top of ch-3. Fasten off (48 dc, 12 ch-1 sps, 4 ch-2 sps).
Assembly of the Squares
Arrange the 12 squares in 3 rows of 4, alternating Color 1 centers as follows:
Row 1: A, B, C, A
Row 2: B, C, A, B
Row 3: C, A, B, C
Joining: With RS facing, use A and sl st through both loops of corresponding sts, working in back loops only for a flat seam. Join squares into rows first, then join the rows together.
Side seams: Fold the joined piece in half with RS together to form the bag shape (front and back). Join the side seams with sl st in A, leaving the top open.
Edging
R1: Join A at top edge, ch 1, sc evenly around top opening, join with sl st to first sc (approx 80 sc).
R2: Ch 1, sc in each sc around, join with sl st. Fasten off (80 sc).
Handles (make 2)
With A, ch 61.
R1: Sc in 2nd ch from hook and in each ch across (60 sc).
Rows 2-3: Ch 1, turn, sc in each sc across (60 sc).
Fasten off, leaving a long tail for sewing.
Assembly and Finishing
Pin the handles to the front and back of the bag, positioning them 2" from the side edges and 1" from the top edge, with the ends overlapping the top edge by 1". Sew the handles securely with A. Weave in all ends. Block the finished bag lightly: pin it to shape, mist with water, and let it dry completely so the squares lie flat and the seams sit straight.
Pro Tips and Variations
- Swap the sage seams for ivory for a softer, more blended patchwork look.
- Add a simple fabric lining and a magnetic snap if you want a sturdier everyday bag.
- Make the handles longer (ch 81) for a shoulder strap, or shorter (ch 41) for a hand-carry tote.