Winter Pine Motif Crochet Bag Free Pattern
Introduction
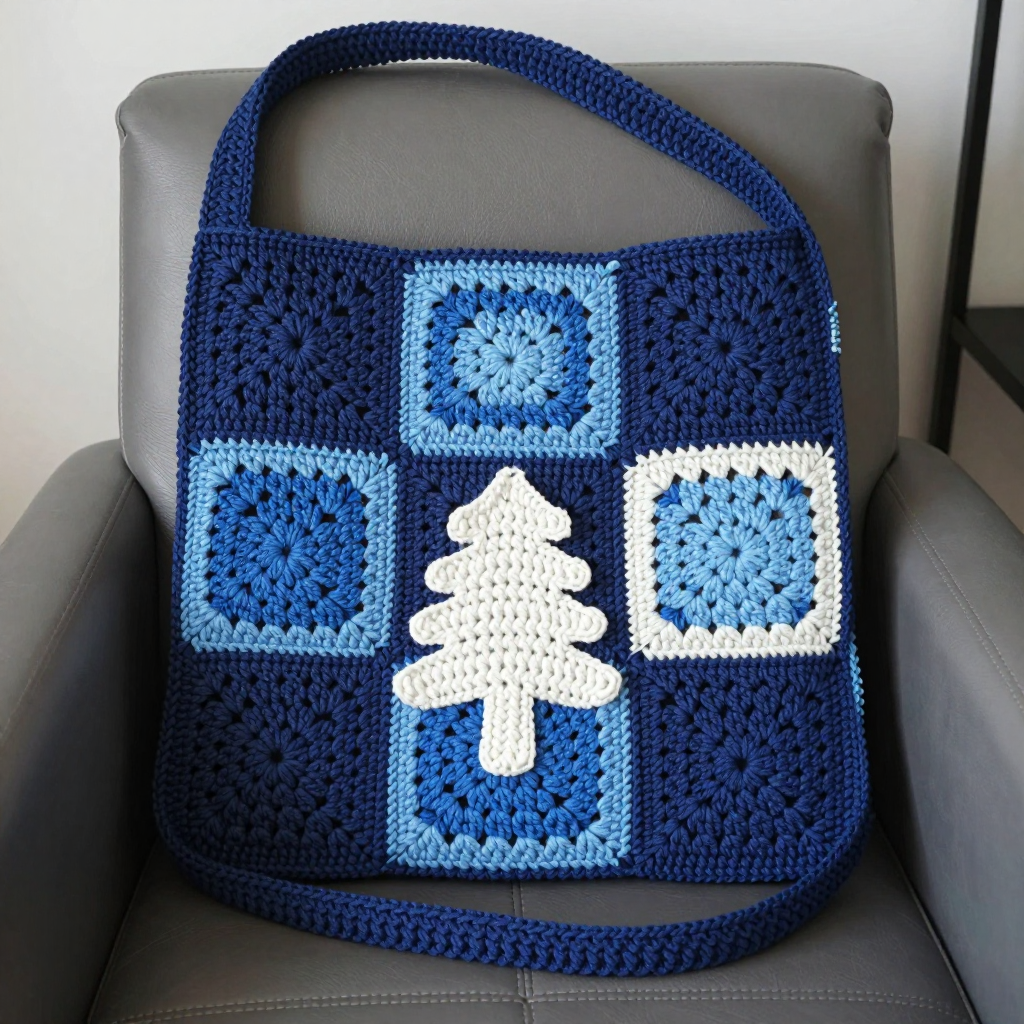
This Winter Pine Motif Crochet Bag is a cozy, Nordic-inspired shoulder bag that comes together from nine solid granny squares in layered ocean blues. It's a wonderful project for anyone who has mastered basic double crochet and wants to try joining squares, adding an appliqué, and finishing a bag that actually holds its shape. The white pine-tree appliqué on the front gives it that quiet winter-forest feel, while the deep blues keep it wearable all year. Once lined and blocked, the bag feels sturdy and soft at the same time — a real everyday companion you'll be proud to carry.
Materials Needed
- Yarn: Worsted weight (category 4) acrylic yarn in four colors:
- Color A (dark blue): 200 yd
- Color B (medium blue): 150 yd
- Color C (light blue): 100 yd
- Color D (white): 50 yd
- Hook: 5.0 mm (H/8) crochet hook
- Notions: Tapestry needle, stitch markers, scissors, measuring tape, sewing needle and thread (for lining), optional 12" x 24" (30.5 cm x 61 cm) cotton fabric for lining
- Finished size: Bag body 12" wide x 12" tall (30.5 cm x 30.5 cm); strap length 40" (101.5 cm)
Abbreviations
- ch — chain
- sl st — slip stitch
- sc — single crochet
- dc — double crochet
- sp — space
- st(s) — stitch(es)
- rep — repeat
Gauge
One solid granny square should measure 4" x 4" (10 cm x 10 cm) after blocking. Work one square first, block it, and measure across the center; if it's larger, go down a hook size, and if it's smaller, go up a hook size.
Tips Before You Start
- Work all nine squares first and block them to exactly 4" x 4" so the 3x3 grid lines up neatly when joined.
- Keep your tension even on the corner spaces — the ch-2 corners should stay open and square, not tight.
- Lay the squares out in the color arrangement before seaming so you can double-check the pattern at a glance.
- If you plan to line the bag, cut and sew the lining before attaching the strap so the seams stay hidden inside.
Step-by-Step Instructions
Solid Granny Square (make 9: 5 with A, 2 with B, 2 with C)
With the first color, ch 4, join with sl st to form a ring.
R1: Ch 3 (counts as dc), 2 dc in ring, [ch 2, 3 dc in ring] 3 times, ch 2, join with sl st to top of ch-3. (12 dc, 4 ch-2 sps)
R2: Ch 3, dc in same st, dc in each dc across to next ch-2 sp, *[2 dc, ch 2, 2 dc] in ch-2 sp, dc in each dc across; rep from * around, join with sl st to top of ch-3. (28 dc, 4 ch-2 sps)
R3: Ch 3, dc in each dc across to next ch-2 sp, *[2 dc, ch 2, 2 dc] in ch-2 sp, dc in each dc across; rep from * around, join with sl st to top of ch-3. (44 dc, 4 ch-2 sps)
R4: Ch 3, dc in each dc across to next ch-2 sp, *[2 dc, ch 2, 2 dc] in ch-2 sp, dc in each dc across; rep from * around, join with sl st to top of ch-3. (60 dc, 4 ch-2 sps)
Fasten off.
Pine Tree Appliqué (make 1 with D)
Ch 11.
Row 1: Sc in 2nd ch from hook and in each ch across. (10 sc)
Row 2: Ch 1, turn, sc in first 4 sc, ch 3, skip 2 sc, sc in next 4 sc. (8 sc, 1 ch-3 sp)
Row 3: Ch 1, turn, sc in first 4 sc, 3 sc in ch-3 sp, sc in next 4 sc. (11 sc)
Row 4: Ch 1, turn, sc in each sc across. (11 sc)
Row 5: Ch 1, turn, sc in first 5 sc, ch 3, skip 2 sc, sc in last 4 sc. (9 sc, 1 ch-3 sp)
Row 6: Ch 1, turn, sc in first 4 sc, 3 sc in ch-3 sp, sc in last 5 sc. (12 sc)
Row 7: Ch 1, turn, sc in each sc across. (12 sc)
Row 8: Ch 1, turn, sc in first 6 sc, ch 3, skip 2 sc, sc in last 4 sc. (10 sc, 1 ch-3 sp)
Row 9: Ch 1, turn, sc in first 4 sc, 3 sc in ch-3 sp, sc in last 6 sc. (13 sc)
Row 10: Ch 1, turn, sc in each sc across. (13 sc)
Row 11: Ch 1, turn, sc in first 7 sc, ch 3, skip 2 sc, sc in last 4 sc. (11 sc, 1 ch-3 sp)
Row 12: Ch 1, turn, sc in first 4 sc, 3 sc in ch-3 sp, sc in last 7 sc. (14 sc)
Row 13: Ch 1, turn, sc in each sc across. (14 sc)
Row 14: Ch 1, turn, sc in first 8 sc, ch 3, skip 2 sc, sc in last 4 sc. (12 sc, 1 ch-3 sp)
Row 15: Ch 1, turn, sc in first 4 sc, 3 sc in ch-3 sp, sc in last 8 sc. (15 sc)
Row 16: Ch 1, turn, sc in each sc across. (15 sc)
Fasten off.
Trunk: With D, join yarn at bottom center of tree, ch 1, sc in same st, sc in next 2 sts. (3 sc) Fasten off.
Assembly of the Bag Body
Arrange the nine squares in a 3x3 grid: Row 1: A, B, A; Row 2: B, C, B; Row 3: A, B, A. Whipstitch the squares together with matching colors.
Fold the joined panel in half with right sides together and whipstitch the side seams.
Sew the pine tree appliqué centered on the front panel using white yarn.
Strap
With A, ch 6.
Row 1: Sc in 2nd ch from hook and in each ch across. (5 sc)
Row 2: Ch 1, turn, sc in each sc across. (5 sc)
Rows 3–end: Rep Row 2 until the strap measures 40" (101.5 cm). Fasten off.
Sew the strap ends to the inside of the bag at the top corners, 1" (2.5 cm) from the side edges.
Edging
With A, join yarn at the top right corner of the bag, ch 1, sc evenly around the top opening, join with sl st to first sc. Fasten off.
Lining (optional)
Cut fabric to 12" x 24" (30.5 cm x 61 cm), fold in half, sew the side seams, insert into the bag, and sew to the top edge.
Assembly and Finishing
Weave in all ends on the wrong side of the bag, using the tapestry needle to tuck them into neighboring stitches. Block the finished bag lightly by misting it and shaping it flat to the 12" x 12" measurements, letting it dry fully before use. If you added a lining, check that the top edge sits smoothly under the edging and stitch any loose spots. Finally, give the strap a gentle tug to confirm the seams are secure before carrying anything heavy.
Pro Tips and Variations
- Swap the blues for forest greens and browns for a woodland version, or use a single color for a minimalist look.
- Add a magnetic snap or a simple button loop at the top opening for a bit of closure.
- Make the strap wider (ch 8 instead of 6) for a more comfortable shoulder fit on a heavier, lined bag.