Pastel Crochet Teapot Cozy Toy Free Pattern
Pastel Crochet Teapot Cozy Toy – Free Beginner Pattern
Introduction
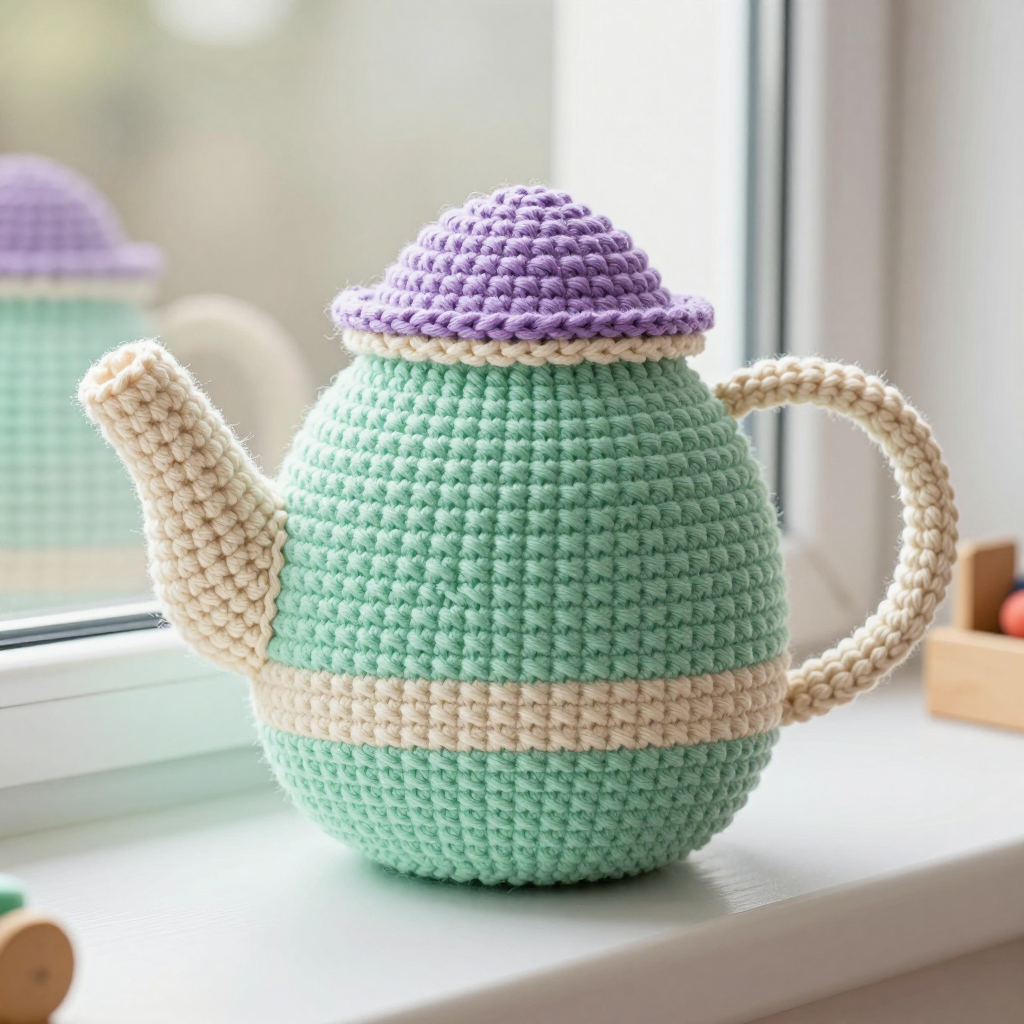
This little pastel teapot is the perfect first amigurumi project for anyone who has just learned single crochet and wants to make something truly charming. Worked in soft mint, cream, and lilac worsted weight yarn, it has a round stuffed body, a gently curving spout, a flat folded handle, and a domed lid that sits neatly on top. The simple single crochet shaping means there are no tricky stitches to learn, just increases and decreases. At about 5 inches tall and wide, it fits in the palm of your hand and looks lovely on a shelf, a desk, or tucked into a gift basket.
Materials Needed
- Yarn: Worsted weight (4) acrylic yarn — mint (A) 80 yd, cream (B) 50 yd, lilac (C) 20 yd
- Hook: 4 mm (G-6) crochet hook
- Notions: Stitch marker, tapestry needle, scissors, polyester fiberfill stuffing
- Finished size: Approximately 5 inches (13 cm) tall and 5 inches (13 cm) wide
Abbreviations
- MR – magic ring: an adjustable loop you crochet into to start a piece with no hole
- sc – single crochet
- inc – increase: work 2 single crochet into the same stitch
- dec – decrease: work 2 single crochet together into one stitch
- ch – chain
- sl st – slip stitch
- st(s) – stitch(es)
- R / Rnd – row / round
Gauge
16 sc and 18 rows = 4 inches (10 cm). Work a small swatch in single crochet and measure it; if you have more stitches than 16 in 4 inches, go up a hook size, and if you have fewer, go down a size.
Tips Before You Start
- Work in a continuous spiral for the body, spout, and lid unless you prefer to join rounds — just keep your stitch marker in the first stitch of each round so you never lose your place.
- Stuff the body firmly but in small handfuls as you go, especially before the final decrease rounds, so the sphere stays round and smooth.
- Stuff the spout and lid only lightly so they keep their shape without bulging.
- Leave generous yarn tails on every piece — they double as your sewing thread during assembly.
Step-by-Step Instructions
Body (Yarn A, then B, then A)
Rnd 1: MR, 6 sc into the ring (6 sts)
Rnd 2: inc x6 (12 sts)
Rnd 3: [sc, inc] x6 (18 sts)
Rnd 4: [2 sc, inc] x6 (24 sts)
Rnd 5: [3 sc, inc] x6 (30 sts)
Rnd 6: [4 sc, inc] x6 (36 sts)
Rnds 7–14: sc in each st around (36 sts)
Change to Yarn B.
Rnds 15–18: sc in each st around (36 sts)
Change to Yarn A.
Rnd 19: [4 sc, dec] x6 (30 sts)
Rnd 20: [3 sc, dec] x6 (24 sts)
Rnd 21: [2 sc, dec] x6 (18 sts) — stuff firmly now
Rnd 22: [sc, dec] x6 (12 sts)
Rnd 23: dec x6 (6 sts)
Fasten off, leaving a tail. Thread the tail through the front loops of the last 6 sts and pull closed; weave in the end.
Spout (Yarn B)
Rnd 1: MR, 6 sc into the ring (6 sts)
Rnd 2: inc x6 (12 sts)
Rnds 3–6: sc in each st around (12 sts)
Rnd 7: [sc, dec] x4 (8 sts)
Rnds 8–10: sc in each st around (8 sts)
Fasten off, leaving a long tail for sewing. Stuff lightly.
Handle (Yarn B)
Setup: Ch 16, join with sl st to form a ring, being careful not to twist the chain.
Rnds 1–4: sc in each ch around (16 sts)
Fasten off, leaving a long tail. Fold the tube flat and sew the two open ends together to make a flat loop.
Lid (Yarn C)
Rnd 1: MR, 6 sc into the ring (6 sts)
Rnd 2: inc x6 (12 sts)
Rnd 3: [sc, inc] x6 (18 sts)
Rnd 4: [2 sc, inc] x6 (24 sts)
Rnd 5: sc in each st around (24 sts)
Fasten off, leaving a long tail. Stuff lightly.
Assembly and Finishing
Using the long tails and a tapestry needle, sew the spout to the body at Rnds 10–12, curving it gently upward as you stitch. Sew the handle to the opposite side of the body at Rnds 8–14, positioning the flat loop so it stands upright. Sew the lid onto the top of the body, covering Rnds 1–3 of the body, and stitch all the way around the lid edge so it sits flat. Weave in all remaining ends on the inside of the toy. Lightly steam or mist the finished teapot and shape it with your hands while it dries to smooth the surface and even out the stuffing.
Pro Tips and Variations
- Swap the pastel palette for any three colors you love — a classic white and blue set gives a traditional china look.
- Add a small hanging loop of chain stitches to the top of the lid so the teapot can double as an ornament.
- Work the cream band in a slightly different texture, such as half double crochet, for a subtle decorative stripe.