Knit Eyelet Check Leg Warmers Free Pattern
Knit Eyelet Check Leg Warmers Free Pattern
Introduction
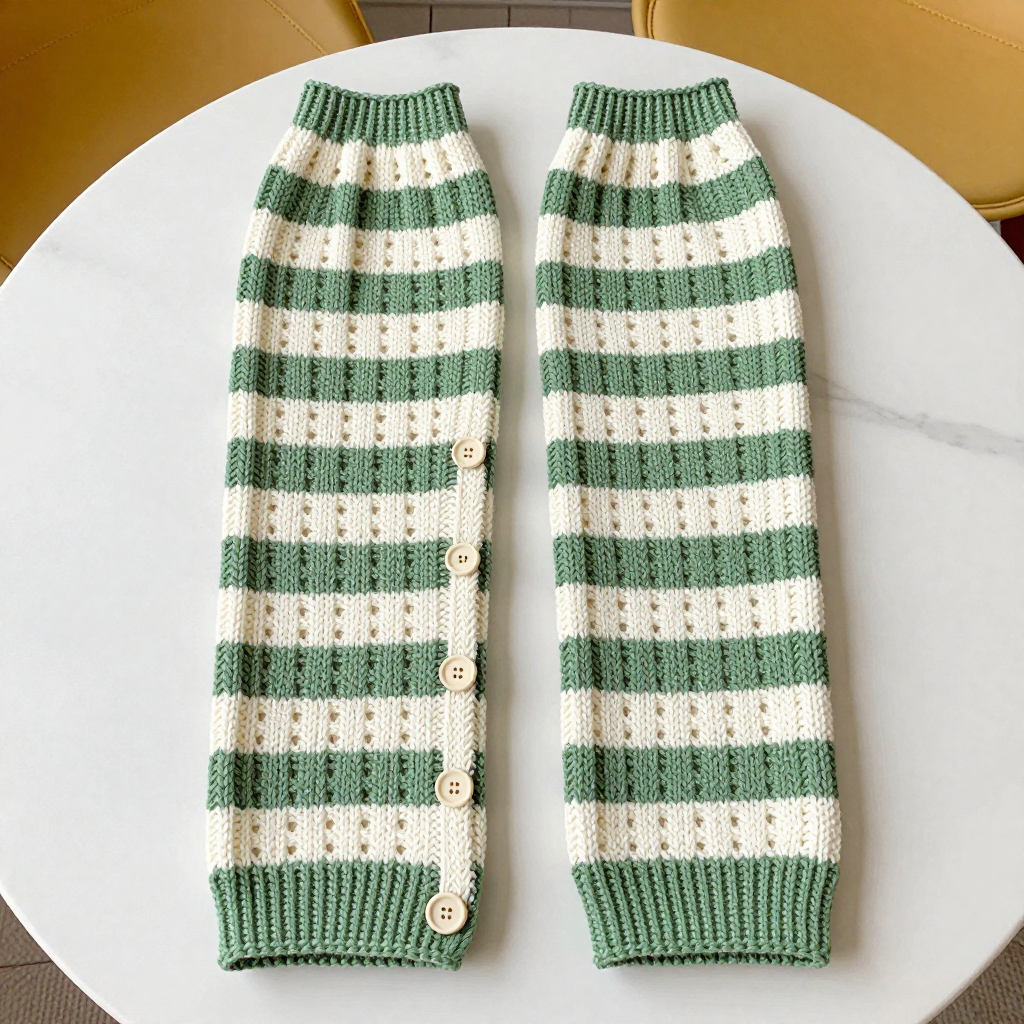
These eyelet check leg warmers are the perfect cozy project for anyone who loves a little kawaii charm in their wardrobe. Worked flat in fingering weight wool, they feature a delicate eyelet checkerboard lace that looks far more complicated than it really is. The alternating sage green and cream stripes give them a soft, vintage feel, while the buttoned sides turn those eyelets into functional buttonholes. Slip them on over leggings or boots for a warm, handmade touch that hugs your calves without any shaping or fuss.
Materials Needed
- Yarn: Fingering weight wool. Sage green (MC): 200 yards. Cream (CC): 100 yards.
- Needles: 3.25 mm (US 3) knitting needles.
- Notions: Tapestry needle, stitch markers, 6 cream buttons (3 per leg warmer), a 3.25 mm crochet hook for the edging.
- Finished size: 14 inches long, 12 inches circumference unstretched, to fit a calf of 11–13 inches.
Abbreviations
- CO: Cast on — make the starting loops on your needle.
- k: Knit stitch.
- p: Purl stitch.
- yo: Yarn over — wrap the yarn around the needle to create an eyelet hole.
- k2tog: Knit two stitches together — a right-leaning decrease.
- ssk: Slip, slip, knit — slip two stitches knitwise, then knit them together — a left-leaning decrease.
- rep: Repeat.
- RS: Right side (the public, outer face of the fabric).
- WS: Wrong side (the inner face of the fabric).
- BO: Bind off.
- sc: Single crochet (used only for the edging).
- MC: Main color (sage green).
- CC: Contrast color (cream).
Gauge
24 stitches and 32 rows = 4 inches in the eyelet checkerboard pattern. Knit a small swatch in pattern, block it lightly, and measure a 4-inch section to confirm your stitch and row counts match before you begin.
Tips Before You Start
- The eyelet pattern is a 16-row block that repeats exactly. Once you have worked Rows 1–16 a couple of times, the checkerboard becomes easy to read, so trust the rhythm.
- Every wrong-side row is plain purl — this is your chance to relax and check that your stitch count is still 72.
- Change colors at the start of a right-side row so the color change sits neatly at the edge of a band.
- Keep your yarn-overs loose and even; tight eyelets are hard to use as buttonholes later.
Step-by-Step Instructions
Leg Warmer (make 2)
With MC, CO 72 sts.
Row 1 (RS): *k4, yo, k2tog, k4, ssk, yo; rep from * to end (72 sts).
Row 2 (WS): Purl (72 sts).
Row 3: *k4, yo, k2tog, k4, ssk, yo; rep from * to end (72 sts).
Row 4: Purl (72 sts).
Row 5: *k4, yo, k2tog, k4, ssk, yo; rep from * to end (72 sts).
Row 6: Purl (72 sts).
Row 7: *k4, yo, k2tog, k4, ssk, yo; rep from * to end (72 sts).
Row 8: Purl (72 sts).
Row 9: *k4, ssk, yo, k4, yo, k2tog; rep from * to end (72 sts).
Row 10: Purl (72 sts).
Row 11: *k4, ssk, yo, k4, yo, k2tog; rep from * to end (72 sts).
Row 12: Purl (72 sts).
Row 13: *k4, ssk, yo, k4, yo, k2tog; rep from * to end (72 sts).
Row 14: Purl (72 sts).
Row 15: *k4, ssk, yo, k4, yo, k2tog; rep from * to end (72 sts).
Row 16: Purl (72 sts).
Change to CC.
Rows 17–32: Work as Rows 1–16 (72 sts).
Change to MC.
Rows 33–48: Work as Rows 1–16 (72 sts).
Change to CC.
Rows 49–64: Work as Rows 1–16 (72 sts).
Change to MC.
Rows 65–80: Work as Rows 1–16 (72 sts).
Change to CC.
Rows 81–96: Work as Rows 1–16 (72 sts).
Change to MC.
Rows 97–112: Work as Rows 1–16 (72 sts).
BO all sts.
Button Placement
Mark 3 button positions on the right selvedge (RS) at approximately 2, 7, and 12 inches from the bottom. Sew buttons on the left selvedge (WS) opposite the eyelets.
Assembly
Fold the rectangle in half lengthwise with RS together. Sew the side seams, leaving 1 inch open at the top and 1 inch open at the bottom for button overlap. Turn RS out. Sew buttons through both layers at the marked positions, using the eyelets as buttonholes.
Edging
With MC, pick up and knit 1 round of sc around the top and bottom edges. BO.
Repeat all steps for the second leg warmer.
Assembly and Finishing
Weave in all yarn ends on the wrong side, working them along the color bands so they disappear. Gently steam or wet-block each leg warmer to the finished measurements of 14 inches long and 12 inches around, pinning the edges straight so the eyelet checkerboard opens up evenly. Once dry, check that the buttons align with the eyelets and adjust any loose button thread. Your leg warmers are ready to wear.
Pro Tips and Variations
- Swap the cream contrast for a soft blush or dusty blue to change the mood while keeping the same striped look.
- Add a fourth button per leg warmer for a more secure fit on larger calves.
- Work the edging in CC instead of MC for a subtle contrast trim at the top and bottom.