Knit Halloween Tulip Doll with Cape Free Pattern
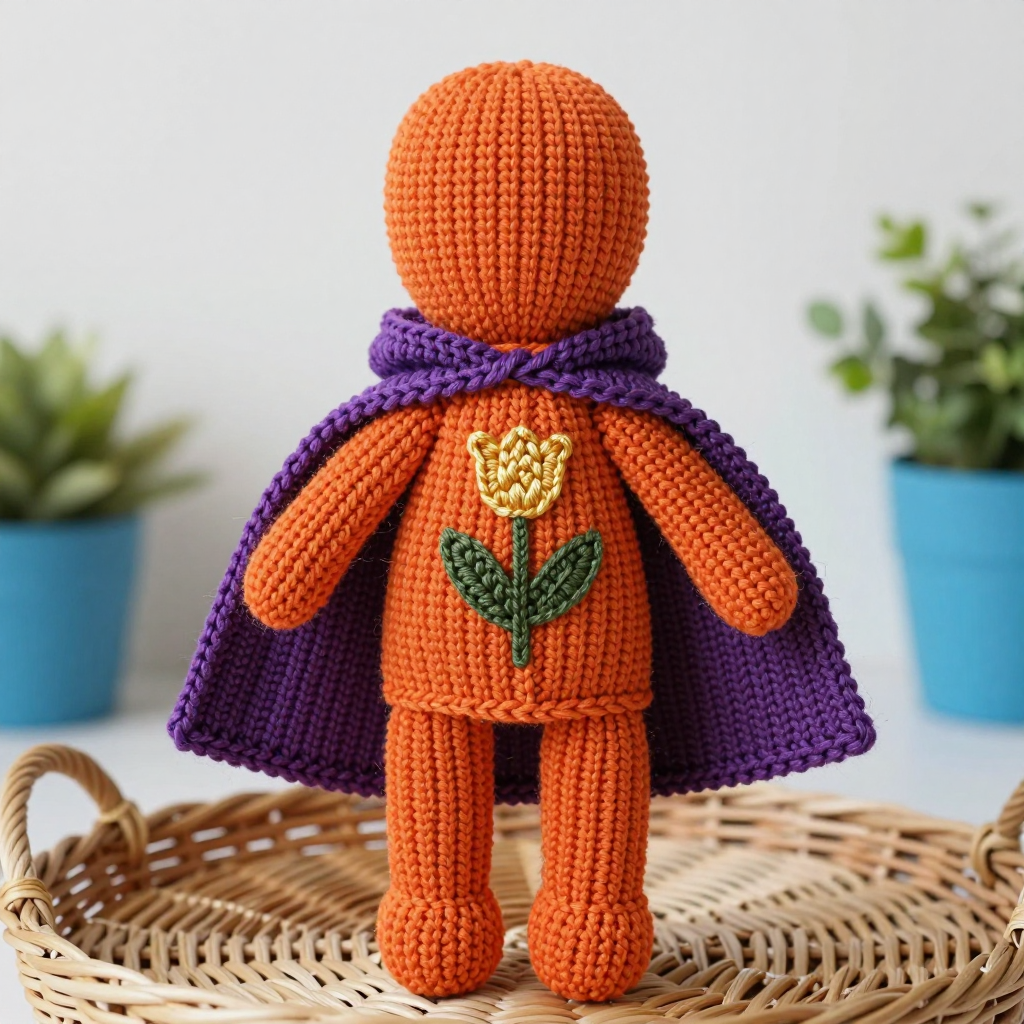
Knit Halloween Tulip Doll with Cape – Free Pattern
Introduction
This little Halloween tulip doll is the perfect first doll project for anyone who can knit, purl, and sew a straight seam. She is built entirely from simple flat rectangles and one easy garter-stitch cape, so there is no fiddly shaping, no working in the round, and no complicated colorwork to worry about.
Her fisherman rib torso gives her a soft, squishy, textured body, while her deep purple cape and olive green tulip appliqué with a golden yellow flower bring cozy Nordic charm in warm spice-market tones.
At about 8 inches (20 cm) tall, she sits happily on a shelf, tucks into a gift bag, or becomes a treasured autumn heirloom. If you can knit a rectangle, you can make this doll.
Materials Needed
- Yarn: Worsted weight acrylic yarn in four colors:
- MC (spice orange): 50 yds
- CC1 (deep purple): 30 yds
- CC2 (olive green): 20 yds
- CC3 (golden yellow): 10 yds
- Needles: 4.0 mm (US 6) knitting needles
- Notions: Tapestry needle, polyester fiberfill for stuffing, scissors, a small amount of scrap yarn or a stitch marker (optional)
- Finished size: Approximately 8 inches (20 cm) tall
Abbreviations
- st(s): stitch(es)
- k: knit
- p: purl
- k1b: knit one stitch in the row below (insert the needle into the stitch directly beneath the next stitch on the left needle and knit it, letting the stitch above slip off)
- k2tog: knit two stitches together (a one-stitch decrease)
- MC: main color (spice orange)
- CC1, CC2, CC3: contrasting colors (purple, olive green, golden yellow)
Gauge
16 sts and 24 rows = 4 inches (10 cm) in fisherman rib. Knit a small swatch in fisherman rib, measure a 4-inch section, and adjust your needle size if your stitch count is off so your doll comes out close to 8 inches tall.
Tips Before You Start
- Keep your tension relaxed and even on the fisherman rib body; this stitch pattern pulls in, so the finished torso will look narrower than a plain stockinette rectangle of the same stitch count.
- Stuff the body and head lightly and evenly. Overstuffing stretches the seams and makes the doll lumpy; understuffing leaves her floppy.
- Pin every piece in place before you sew. A quick pin-and-check saves you from unpicking a crooked arm or a lopsided cape.
- Use the same yarn for seaming as for the piece whenever possible so the seams blend in, and leave long tails (about 12 inches) when you bind off to make assembly easier.
Step-by-Step Instructions
Body (MC)
Cast on 20 sts.
Row 1: k1, [k1b, p1] to last st, k1 (20 sts).
Rows 2-24: Repeat Row 1 (20 sts).
Bind off. Leave a long tail for seaming.
Head (MC)
Cast on 12 sts.
Row 1 (RS): k across (12 sts).
Row 2 (WS): p across (12 sts).
Rows 3-12: Repeat Rows 1-2, ending with a RS row (12 sts).
Bind off. Leave a long tail for seaming.
Arms (MC) – make 2
Cast on 6 sts.
Row 1 (RS): k across (6 sts).
Row 2 (WS): p across (6 sts).
Rows 3-10: Repeat Rows 1-2, ending with a RS row (6 sts).
Bind off. Leave a long tail for seaming.
Legs (MC) – make 2
Cast on 8 sts.
Row 1 (RS): k across (8 sts).
Row 2 (WS): p across (8 sts).
Rows 3-12: Repeat Rows 1-2, ending with a RS row (8 sts).
Bind off. Leave a long tail for seaming.
Cape (CC1)
Cast on 40 sts.
Row 1: k across (40 sts).
Row 2: k across (40 sts).
Row 3: k across (40 sts).
Row 4: k2tog, k to last 2 sts, k2tog (38 sts).
Rows 5-7: k across (38 sts).
Row 8: k2tog, k to last 2 sts, k2tog (36 sts).
Rows 9-11: k across (36 sts).
Row 12: k2tog, k to last 2 sts, k2tog (34 sts).
Rows 13-15: k across (34 sts).
Row 16: k2tog, k to last 2 sts, k2tog (32 sts).
Bind off. Leave a long tail for seaming.
Tulip Appliqué (CC2 and CC3)
Tulip (CC2): Cast on 10 sts.
Row 1 (RS): k across (10 sts).
Row 2 (WS): p across (10 sts).
Rows 3-6: Repeat Rows 1-2, ending with a RS row (10 sts).
Bind off. Leave a long tail for sewing.
Flower (CC3): Using the golden yellow yarn and a tapestry needle, embroider a small satin-stitch circle at the top center of the tulip piece, about ½ inch (1 cm) across, working several straight stitches back and forth over the same small area until it is filled.
Assembly and Finishing
Body: Fold the body rectangle in half with right sides together and sew the side seam with a whipstitch or mattress stitch. Turn right side out, stuff firmly but evenly, and sew the bottom edge closed. Leave the top edge open for now.
Head: Fold the head rectangle in half with right sides together, sew the side seam, turn right side out, and stuff lightly. Sew the bottom edge closed, then sew the head to the top of the body with small, even stitches, going around the join twice for security.
Arms and legs: Fold each arm and leg rectangle in half with right sides together, sew the long side seam, turn right side out, and stuff lightly. Sew the open end of each arm to the upper sides of the body and each leg to the lower sides, angling them slightly outward.
Cape: Fold the cape in half with right sides together and sew the short side seam to form a cone, leaving the top and bottom open. Turn right side out. Sew the top edge of the cape around the neck of the doll, gathering it slightly so it sits snugly, with the seam at the back.
Tulip: Sew the tulip appliqué to the front center of the body with small stitches around all four edges, placing it just below the neckline and above the legs.
Finishing: Weave in all remaining ends on the wrong side. Block lightly by misting with water and patting into shape, then let the doll air-dry completely before displaying.
Pro Tips and Variations
- Swap the spice orange MC for charcoal gray or cream for a more wintry Nordic look, or change CC1 to black for a spookier Halloween cape.
- Add a tiny embroidered face (two French-knot eyes and a small straight-stitch smile) before sewing the head to the body, so you can work flat and comfortably.
- Make a second tulip in a contrasting color and sew it to the back of the cape, or add a small yarn loop at the top of the head so the doll can hang as an ornament.